
Planning an observation for a telescope is quite a tricky thing. You may know that you want to observe a galaxy, but which of the many millions we know of? And exactly what do you need the telescope to do to get the image or data you want?
The Go Observing pages will help you through all the decisions you need to make, but here you can learn a bit more about all the details.
- Coordinates: Where is it?
As the Earth spins each day and orbits around the Sun each year, the part of the sky that can be seen from any place on Earth changes.
We use coordinates to help work out if something is visible at a telescope at any particular time.
Image CreditThis work by ChristianReady is licensed under Creative Commons Attribution Share Alike 4.0 International
Equitorial Coordinate System Every star and galaxy has its own coordinates, which tell us where it is in the sky around the Earth.
At any time, we can use that coordinate to work out where a telescope would need to point to observe it.
There are 3 main things that coordinates tell us which are helpful for observations:
- North/South: Some objects are only visible in the northern or southern hemisphere. The coordinates give us this information, meaning an observatory site can be chosen where the target rises high enough above the horizon to be viewed easily.
- Time of year: As the Earth orbits around the Sun, different parts of the night sky appear to move away from the Sun. This is the bit of sky that is "up" during the night. We can use coordinates to work out when an object is visible at night and not hidden by the bright daytime sky during the year.
- Time of night: As the Earth spins, the stars look like they move across the sky, with some rising and setting just like the Sun. Using an object's coordinates, we can find the best time to observe it each night, usually when it is high in the sky.
This is all a bit more complicated for the Moon, asteroids, and planets that are orbiting around the Sun, as their coordinates do not stay the same. However, we can calculate what their coordinates are at a particular time, so we can still work out when they can be observed.
The coordinates of objects are used to help to make the coloured bars that you might see as you Go Observing.
- Instrument: What do you want to find out?
Professional telescopes usually have several different instruments. Which instrument you use will depend on what you want to learn from your observation.
If you want to measure the size of a galaxy or the brightness of a star, you can use a camera to get a nice image. But if you want to find out what something is made of, you can use a spectrograph or spectroscope.
Image CreditThis work by A.Scott/ The Liverpool Telescope/ Astrophysics Research Institute is licensed under All rights reserved
The inside of the FRODOSpec spectrograph on the LT There are other instruments as well that can be used for different kinds of science.
- Optical Cameras: These are rather like the camera you might have on a phone, but a bit more sophisticated, a lot bigger and much more sensitive (which means they can get images of very faint things).
- Infra-red Cameras: Some of the things we want to study in the universe make light that we cannot see - other parts of the electromagnetic (EM) spectrum. One exciting kind of EM light is infrared. This is made by things that are a bit less hot than stars. It can be seen through big clouds of dust in space.
- Spectrographs: Spectrographs split the light into all the different colours like a rainbow. Astronomers use these sorts of observations to measure many other things: chemical composition, temperature of stars, redshift of distant galaxies and much more.
- Fast-readout cameras: Sometimes astronomical objects change very quickly. There might be explosions near a giant black hole as a star falls in, or a neutron star that is spinning very fast. To measure these quick changes, special cameras are used that can take lots of images very fast.
- Sky Cameras: Sometimes, looking at a large part of the sky or even all of it is useful. This might be to try to find unusual, rare kinds of objects or to monitor the weather.
- Field-of-View: How big is it?
Although stars appear as dots in the sky, other kinds of objects, like galaxies or nebulae, can look quite big. How big an object looks depends on both how big it actually is and how far away it is. The further away, the smaller it will look.
Image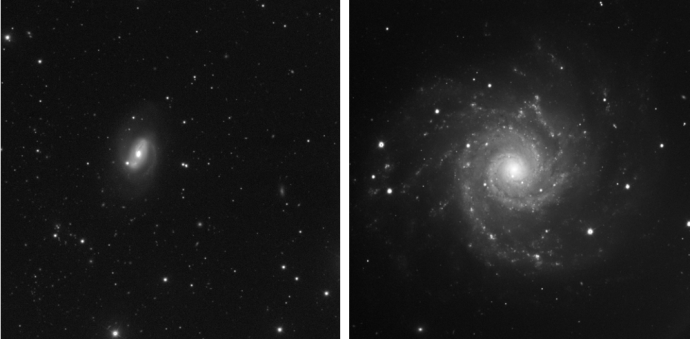 CreditThis work by Liverpool Telescope/The Schools' Observatory is licensed under All rights reserved
Comparing a small galaxy (NGC 23, left) and a large one (Messier 74, right) Every instrument will have a Field-of-view or FoV, which is how much of the sky it can see. If you want to make sure you get the correct measurements, you must check that the object you are observing fits into the FoV of your chosen instrument. If it doesn't, you will either have to choose a different object, change the instrument, or take several observations to stick together.
Because how big an object looks depends on both its size and how far away it is, astronomers do not always use things like kilometres to measure sizes. Instead, they use the angular size, which is how big something looks, measured as an angle. So, if you want to know if an object is suitable, you can compare its angular size to the field of view of the camera.
For example, the FoV of the main camera on the Liverpool Telescope (called IO:O) is 10 arcminutes, which is 1/6th of a degree. The Andromeda galaxy is about 6 degrees across, so far too big to be observed by IO:O. However, the Fireworks Galaxy is just over 9 arcminutes across and fits in the FoV very well.
There are many galaxies, nebulae, and so on in the Universe. It can be quite difficult to find out or measure their size. In Go Observing, we have selected objects that fit into the FoV well.
- Exposure Time: How long to look?
One of the main reasons why telescopes have such big mirrors and lenses is to gather as much light as possible. This means that very faint things can be observed.
Observations can be made even better by looking for a very long time. The longer you point a telescope at something, the more light you will collect. This is called the exposure time.
Image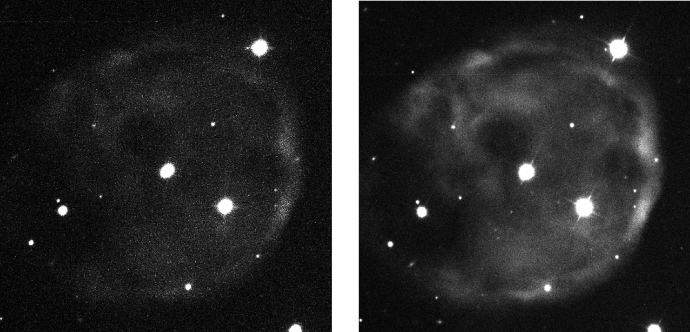 CreditThis work by Liverpool Telescope/The Schools' Observatory is licensed under All rights reserved
Observations of a nebula with different exposure times (left: exposure time of 30 seconds, right: exposure time of 120 seconds) Working out the best exposure time for an observation can be quite tricky. Obviously, suppose you have a telescope entirely for yourself, and you only want to get one observation. In that case, you can simply take it all night.
However, professional telescopes are used by many astronomers, and they usually want to get as many things done as possible. You have to make sure the exposure time is long enough to find out what you want to learn, but not any longer, as that would waste telescope time.
To work out the exposure time, you need to consider lots of different things:
- Brighter objects need shorter exposure times. A bright star will need less time to get a measurement than a faint one.
- You need to know how sensitive the instrument is (which tells you how much of the light that reaches the camera is actually detected by it). A normal digital camera in a smartphone might detect less than half of the light that hits it. The cameras on large telescopes are kept very cold, which means they can detect as much as 98% of the light.
- Finally, you have to decide how good you need the data to be. If you want to find out where something is, then as long as you can see it in the observation, that would be good enough. You might only need a short exposure time to achieve this. However, if you want to measure a very small change in how bright it is, you will need much better data and so a longer exposure time.
Because calculating exposure times is quite complicated, Go Observing will do the work for you. However, for some of the more advanced observations you may get to choose different exposure times to see how that changes your images.
- Filters: What colour?
Most cameras on professional telescopes only measure the brightness of things. They are not able to measure colour at the same time. However, colour can tell you a lot about the universe. For example, hot, blue stars are usually bigger and brighter than small red ones.
To find out about these colours, astronomers use special coloured glass filters. These only let through light of a particular range of colours, for example red. By looking at the differences between images taken using filters, you can find out a lot about the colours of the objects. For example, a blue star will be brighter in an image taken through a blue filter than in one taken through a red filter.
Filters on professional telescopes are very carefully made to let through an exact range of colours. This means that filters on different telescopes are the same, and astronomers can easily compare images from different telescopes.
Image CreditThis work by NASA/JPL-Caltech is licensed under Creative Commons Zero v1.0 Universal
The filters on NASA's Roman Space Telescope Some examples of filters include:
- I filter: This is the reddest filter and includes quite a lot of infrared light.
- R filter: The red filter. This is a good one to use for most stars and galaxies.
- V filter: V stands for "visual", and this covers most of the middle of the rainbow. It picks up lots of green light.
- G filter: Although it may sound like this is the best green filter, it actually contains quite a lot of blue light as well.
- B filter: The blue filter. For some fainter objects, the G filter is slightly better for blue light.
- U filter: This includes a bit of ultraviolet (UV) light. It is quite good for very blue objects, but the camera is less sensitive to UV light than visible light, so exposure times must be much longer.
- H-alpha filter: This special "narrow" filter only lets through a very small range of colour in the red part of the spectrum. This is exactly the colour of light that the element hydrogen can make when it gets hot. As hydrogen is the most common element in the universe, this filter is good when you are hunting for hot gas.
- Neutral Density (ND) filters: These have no particular colour but, unlike other filters, actually stop a certain amount of all colours. While this is normally a bad idea, you might need an ND filter for objects like the Moon or bright planets to stop the camera from getting overwhelmed (or saturated). The Liverpool Telescope has 2 ND filters - NDI-V which lets through about 1/30th of the light, and NDIII which only lets through 1/1000th! Using both at the same time only lets through 1/30,000th of the light. This is needed to observe very bright things like Venus.
For most observations in Go Observing, we have chosen the best filters. However, there are some advanced options where you can experiment with different filters.
- Seeing: How blurry can your image be?
"Seeing" is what astronomers call the "blurring" of astronomical pictures by the atmosphere. The amount of blurring changes and observations that need the sharpest possible images can only be done at certain times.
Video fileSame nebula with different seeing (This work by Liverpool Telescope/Schools' Observatory is licensed under All Rights Reserved) Although observatories are usually built in locations with good seeing conditions, it can vary. When planning your observations, you need to think about how blurry it can be before it stops you from learning what you want to find out.
If you need the best conditions, the telescope can wait until the seeing is at its best. That will, of course, mean you might have to wait a long time. You may also have to work around other observations that need the same rare, high-quality seeing. On the other hand, if you let the telescope observe at any time, your observation might be done more quickly, but it could be very "blurry".
When you choose an observation in Go Observing, unless it asks you to select the seeing conditions you want, it will choose a good balance between getting the observations done as quickly as possible and not being too blurred.
- Sky Brightness: How faint can you go?
While some things in the night sky are quite bright, like the Moon or some stars, many of the things we want to observe are quite faint. Even with a big mirror and a long exposure time, some faint objects are still difficult to observe, especially if the sky is not really dark.
Fortunately, most professional telescopes are far from cities and towns, so we do not need to worry about light pollution. But some other things, like twilight or the Moon, can make the sky too bright to observe the faintest objects.
Twilight: Just after the Sun has set, and again as dawn is approaching, the sky gets brighter. Even when you might not be able to see the difference with your own eyes, the special cameras on the telescope can tell the difference. For any objects that are not bright, we need to avoid what is called "Astronomical Twilight".
Moon: The Moon is bright enough that it can make the whole sky glow. How bright the sky is around your object depends on the phase of the Moon (the full moon is obviously brighter) but also on how far apart the object and the Moon appear to be. This can be very important for fainter, fuzzy objects like galaxies and nebulae. It often means they cannot be observed near the full moon.
Image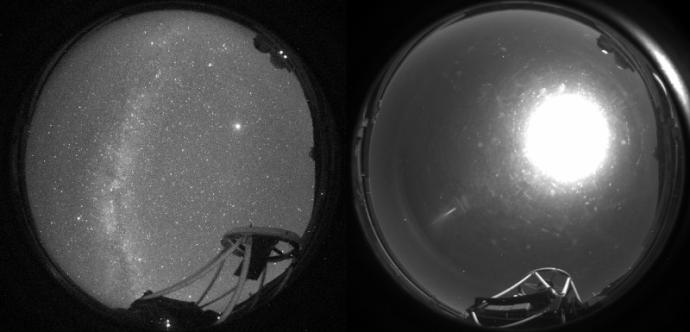 CreditThis work by Liverpool Telescope is licensed under All rights reserved
SkyCamA images above Liverpool Telescope on different nights. On the left, the Milky Way is visible. But on the right, the moon is too bright for it to be seen. The effect of sky brightness can be predicted, so it is used to help make the coloured bars that you might see as you Go Observing.